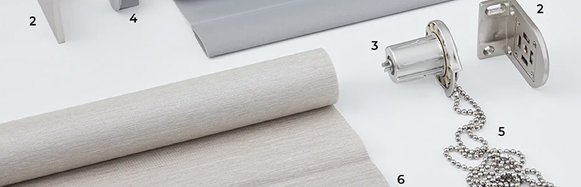
Your custom kit:

OK it’s time to start installing,
let’s take it step by step
Battery powered
1. Wake up your blind motor
To activate your motor, press the motor button (Altus) or pin hole button (Sonesse) on the side of your roller blind. The blind ought to go up and down jogging. Keep in mind that you must charge your motor batteries before you begin.
Follow steps 1 through 10 to add each roller blind, including double and linked blinds, to your remote control one at a time. Avoid attempting to put them up at the same time. You can group blinds after you’ve added each one to your remote.
2. Pick your channel
To select the channel that will control your blind, click the channel button located at the bottom of a remote control with five channels. The channel you are on is indicated by the red light.
This step can be omitted for remote controls with one channel.
3. Assign your blind to the channel
Hold down the up and down buttons simultaneously for 2 seconds. Your blind will jog up and down, once your blind has been assigned to the channel.
Blinds won’t jog? See ‘I need some extra help’ at bottom of page.
4. Check your roll direction
Make sure your blinds are rolling in the correct direction by using the up or down button on your remote.
Holding down the “my” button for two seconds can cause your blinds to jog up and down if your roll direction is incorrect. Your blinds should now roll in the correct direction after another check.
5. Set your blind’s upper limit (part A)
To set the upper limit, press the up button until your blind rolls all the way up. To push your blind down if you go a bit too far, simply hit the down button.
6. Set your blind’s upper limit (part B)
A. Your blind will automatically begin to run downward if you hold down the down and my buttons at the same time. To stop the blind before it reaches the bottom, release the buttons and hit the my button.
7. Set your blind’s lower limit (part A)
A. To set the lower limit, press the down button until your blind rolls all the way down. Keep in mind that you can push your blind back up by using the up button if you go a little too far.
8. Set your blind’s lower limit (part B)
A. Your blind will run all the way up to your top limit if you simultaneously press the my and up buttons.
9. Confirm your end limits
For two seconds, hold down the “my” button until the blind jogs. Your upper and lower limits are now memorized by the control.
10. Finish your remote set up
To make your blinds jog, take a paperclip or pin and hit the program button on the remote’s rear for less than a second.
Try again by simply tapping the button if your blind doesn’t jog; pressing and holding the program button won’t work. Make sure the blind jogs are set up completely.
The Somfy remote is ready for you to use! To manage your blind, use the up and down buttons; to stop it from moving, use the my button.
Remember to follow steps 1 through 10 for each additional blind motor, one at a time, in order to configure your remote control for multiple blinds, including double and linked blinds. Then group them by following the steps in the Grouping your blinds tab of this guide.
Wired
1. Plug in your motor
Verify that your power is turned on and that your motor is plugged in.
Follow steps 1 through 10 to add each roller blind, including double and linked blinds, to your remote control one at a time. With the exception of the blind you are setting up, you must ensure that all other blinds are switched off at the power. You can group blinds after you’ve added each one to your remote.
2. Pick your channel
To select the channel that will control your blind, click the channel button located at the bottom of a remote control with five channels. The channel you are on is indicated by the red light.
This step can be omitted for remote controls with one channel.
3. Assign your blind to the channel
For two seconds, simultaneously press and hold the up and down buttons. After being allocated to the channel, your blind will jog up and down.
Can’t blinds jog? You can see ‘I need some extra help’ at the bottom of the page.
4. Check your roll direction
Make sure your blinds are rolling in the correct direction by using the up or down button on your remote.
Holding down the “my” button for two seconds can cause your blinds to jog up and down if your roll direction is incorrect. Your blinds should now roll in the correct direction after another check.
5. Set your blind’s upper limit (part A)
To set the upper limit, press the up button until your blind rolls all the way up. To push your blind down if you go a bit too far, simply hit the down button.
6. Set your blind’s upper limit (part B)
Hold down the my and down buttons simultaneously and your blind will start to run downwards automatically, then release the buttons and press the my button to stop the blind before it reaches the bottom.
7. Set your blind’s lower limit (part A)
To set the lower limit, press the down button until your blind rolls all the way down. Keep in mind that you can push your blind back up by using the up button if you go a little too far.
8. Set your blind’s lower limit (part B)
Hold down the my and up buttons simultaneously and your blind will run all the way up to your upper limit.
9. Confirm your end limits
For two seconds, hold down the “my” button until the blind jogs. Your upper and lower limits are now memorized by the control.
10. Finish your remote set up
To make your blinds jog, take a paperclip or pin and hit the program button on the remote’s rear for less than a second.
Try again by simply tapping the button if your blind doesn’t jog; pressing and holding the program button won’t work. Make sure the blind jogs are set up completely.
The Somfy remote is ready for you to use! To control your blind, use the up and down arrow keys. To stop your blind from moving, use the my button.
Simply perform steps 1 through 10 for each additional blind motor, one at a time, to configure your remote control for multiple blinds, including double and linked blinds. Before adding the next blind to your remote, don’t forget to turn off the power to the previous blind. Next, organize them by following the instructions in this guide’s Grouping your blinds page.
1. Check you’ve set up your remote(s)
Prior to grouping your blinds, connect each blind to your remote by following the instructions in this guide’s Battery powered or Wired tabs.
2. Choose a blind to group
For remotes with five channels, choose the blind channel you wish to group by clicking the channel button at the bottom of the remote. The channel you are on is indicated by the red light. Steps 1 through 6 will be followed in order to group each blind individually.
You can omit this step for remote controls with one channel. Simply keep the remote control for the blind person you wish to group close at hand.
3. Put the blind into programming mode
Grab a paperclip or pin and hold down the program button on the back of your remote, until your blind jogs.
4. Choose your group channel
To choose the new channel you wish to group all of your blinds on for a five-channel remote, click the channel button.
Grab the remote if you’re using a different one-channel remote for grouping.
5. Add your blind to your group channel
To make your blinds jog, take a paperclip or pin and hit the program button on the back of the remote control you’re using to arrange your blinds for less than a second. Congratulations! You may now operate your blind on both your group channel and the original channel or remote!
Didn’t adding your blinds work? Pressing the program button should be done quickly—less than a second. Wait a few minutes and try step 2 again if it didn’t work.
6. Repeat to group more blinds
To add more blinds to your group channel or remote, follow these steps 1 through 5.
- Somfy Altus & Sonesse
-
Battery powered
1. Wake up your blind motor
To activate your motor, press the motor button (Altus) or pin hole button (Sonesse) on the side of your roller blind. The blind ought to go up and down jogging. Keep in mind that you must charge your motor batteries before you begin.
Follow steps 1 through 10 to add each roller blind, including double and linked blinds, to your remote control one at a time. Avoid attempting to put them up at the same time. You can group blinds after you’ve added each one to your remote.
2. Pick your channel
To select the channel that will control your blind, click the channel button located at the bottom of a remote control with five channels. The channel you are on is indicated by the red light.
This step can be omitted for remote controls with one channel.
3. Assign your blind to the channel
Hold down the up and down buttons simultaneously for 2 seconds. Your blind will jog up and down, once your blind has been assigned to the channel.
Blinds won’t jog? See ‘I need some extra help’ at bottom of page.
4. Check your roll direction
Make sure your blinds are rolling in the correct direction by using the up or down button on your remote.
Holding down the “my” button for two seconds can cause your blinds to jog up and down if your roll direction is incorrect. Your blinds should now roll in the correct direction after another check.
5. Set your blind’s upper limit (part A)
To set the upper limit, press the up button until your blind rolls all the way up. To push your blind down if you go a bit too far, simply hit the down button.
6. Set your blind’s upper limit (part B)
A. Your blind will automatically begin to run downward if you hold down the down and my buttons at the same time. To stop the blind before it reaches the bottom, release the buttons and hit the my button.
7. Set your blind’s lower limit (part A)
A. To set the lower limit, press the down button until your blind rolls all the way down. Keep in mind that you can push your blind back up by using the up button if you go a little too far.
8. Set your blind’s lower limit (part B)
A. Your blind will run all the way up to your top limit if you simultaneously press the my and up buttons.
9. Confirm your end limits
For two seconds, hold down the “my” button until the blind jogs. Your upper and lower limits are now memorized by the control.
10. Finish your remote set up
To make your blinds jog, take a paperclip or pin and hit the program button on the remote’s rear for less than a second.
Try again by simply tapping the button if your blind doesn’t jog; pressing and holding the program button won’t work. Make sure the blind jogs are set up completely.
The Somfy remote is ready for you to use! To manage your blind, use the up and down buttons; to stop it from moving, use the my button.
Remember to follow steps 1 through 10 for each additional blind motor, one at a time, in order to configure your remote control for multiple blinds, including double and linked blinds. Then group them by following the steps in the Grouping your blinds tab of this guide.
- Somfy Altus & Sonesse
-
Wired
1. Plug in your motor
Verify that your power is turned on and that your motor is plugged in.
Follow steps 1 through 10 to add each roller blind, including double and linked blinds, to your remote control one at a time. With the exception of the blind you are setting up, you must ensure that all other blinds are switched off at the power. You can group blinds after you’ve added each one to your remote.
2. Pick your channel
To select the channel that will control your blind, click the channel button located at the bottom of a remote control with five channels. The channel you are on is indicated by the red light.
This step can be omitted for remote controls with one channel.
3. Assign your blind to the channel
For two seconds, simultaneously press and hold the up and down buttons. After being allocated to the channel, your blind will jog up and down.
Can’t blinds jog? You can see ‘I need some extra help’ at the bottom of the page.
4. Check your roll direction
Make sure your blinds are rolling in the correct direction by using the up or down button on your remote.
Holding down the “my” button for two seconds can cause your blinds to jog up and down if your roll direction is incorrect. Your blinds should now roll in the correct direction after another check.
5. Set your blind’s upper limit (part A)
To set the upper limit, press the up button until your blind rolls all the way up. To push your blind down if you go a bit too far, simply hit the down button.
6. Set your blind’s upper limit (part B)
Hold down the my and down buttons simultaneously and your blind will start to run downwards automatically, then release the buttons and press the my button to stop the blind before it reaches the bottom.
7. Set your blind’s lower limit (part A)
To set the lower limit, press the down button until your blind rolls all the way down. Keep in mind that you can push your blind back up by using the up button if you go a little too far.
8. Set your blind’s lower limit (part B)
Hold down the my and up buttons simultaneously and your blind will run all the way up to your upper limit.
9. Confirm your end limits
For two seconds, hold down the “my” button until the blind jogs. Your upper and lower limits are now memorized by the control.
10. Finish your remote set up
To make your blinds jog, take a paperclip or pin and hit the program button on the remote’s rear for less than a second.
Try again by simply tapping the button if your blind doesn’t jog; pressing and holding the program button won’t work. Make sure the blind jogs are set up completely.
The Somfy remote is ready for you to use! To control your blind, use the up and down arrow keys. To stop your blind from moving, use the my button.
Simply perform steps 1 through 10 for each additional blind motor, one at a time, to configure your remote control for multiple blinds, including double and linked blinds. Before adding the next blind to your remote, don’t forget to turn off the power to the previous blind. Next, organize them by following the instructions in this guide’s Grouping your blinds page.
- Grouping your blinds
-
1. Check you’ve set up your remote(s)
Prior to grouping your blinds, connect each blind to your remote by following the instructions in this guide’s Battery powered or Wired tabs.
2. Choose a blind to group
For remotes with five channels, choose the blind channel you wish to group by clicking the channel button at the bottom of the remote. The channel you are on is indicated by the red light. Steps 1 through 6 will be followed in order to group each blind individually.
You can omit this step for remote controls with one channel. Simply keep the remote control for the blind person you wish to group close at hand.
3. Put the blind into programming mode
Grab a paperclip or pin and hold down the program button on the back of your remote, until your blind jogs.
4. Choose your group channel
To choose the new channel you wish to group all of your blinds on for a five-channel remote, click the channel button.
Grab the remote if you’re using a different one-channel remote for grouping.
5. Add your blind to your group channel
To make your blinds jog, take a paperclip or pin and hit the program button on the back of the remote control you’re using to arrange your blinds for less than a second. Congratulations! You may now operate your blind on both your group channel and the original channel or remote!
Didn’t adding your blinds work? Pressing the program button should be done quickly—less than a second. Wait a few minutes and try step 2 again if it didn’t work.
6. Repeat to group more blinds
To add more blinds to your group channel or remote, follow these steps 1 through 5.
Have Questions? Reach Out and Inquiry Now
If you have any questions or need assistance, don’t hesitate to reach out! We're here to help and provide the information you need. Whether it's a quick inquiry or a detailed discussion, just let us know how we can assist you today.