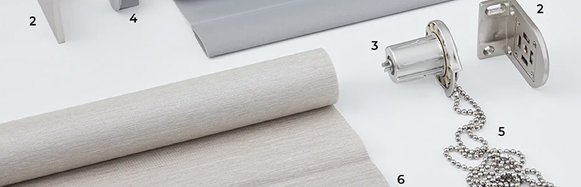
Your custom kit:

OK it’s time to start installing,
let’s take it step by step
Face fit
1. Get organised
A. After unpacking your kit, carefully spread everything out on a spotless, sturdy surface or the cardboard container it arrived in. When shifting the parts, take care not to scratch them.
B. To make it easier for you to match up the correct panels and hinges later, we label parts of your frame and panels. The shutter panels should be arranged from left to right and correctly up.
2. Click your shutter frame together and screw holes
A. Using the Hoffmann keys in your customized kit, click each segment of your shutter frame together. You can even utilize your body weight if you’d like.
Parts of your shutter frame have the keys fastened to them. It’s okay if they’ve fallen out; simply slide them back in.
It’s generally because the Hoffmann keys have come out on one side that you’re having trouble.
B. If you have T posts, use the long black screws in your custom kit and your cordless drill to secure them to your shutter frame. Your shutter frame has pre-drilled holes that indicate where the T posts should be attached. Your T post will have the letters t at the top and b at the bottom.
C. Lay your shutter frame back down after flipping it over. Drill holes through the back of the shutter frame, aligning each hinge with the 3 mm drill bit on your cordless drill. Additionally, drill four uniformly spaced holes in the top and bottom of the shutter frame’s back. The shutter frame’s rear will fasten to the frame of your window.
3. Mount your shutter frame
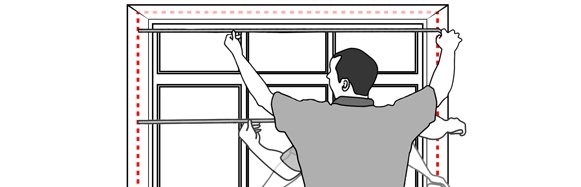
A. Lift your frame into place, on the outside of your window frame. It can help to have two people for larger frames, so you don’t bump the corners of your shutter frame.
Drill each screw at the top of your shutter frame part way in, using your cordless drill with the Phillips head drill bit and the screws in your custom kit.
B. Wiggle the frame until you get it looking level across the top. You can rest a spirit level on top of the frame while you do this.
Tighten the top screws.
C. Drill in your side screws next, and then your bottom screws. You can check your shutter frame is even across the top by using a spirit level.
4. Attach your shutter panels and check your shutter frame
A. Before you begin, take off any black bands from your hinge pins. Grab your left panel and hold it in place. The brackets on the left side of your panel and shutter frame should line up. From the top, insert a hinge pin through the bracket. For every panel, repeat.
Does the hinge pin not slide in? Verify whether your frame is fastened upside down or if your panels are inverted.
B. Verify that your panels are easy to open and close. It’s common to need to lift the panel’s edge and prod it on because they can be heavy.
C. Make sure there is a small, uniform space between the shutter panels and the shutter frame on both sides.
5. Get Insta ready
Take the stickers from your personalized kit and adhere them to every screw that is visible.
Face fit frameless window
1. Get organised
A. After unpacking your kit, carefully spread everything out on a spotless, sturdy surface or the cardboard container it arrived in. When shifting the parts, take care not to scratch them.
B. To make it easier for you to match up the correct panels and hinges later, we label parts of your frame and panels. The shutter panels should be arranged from left to right and correctly up.
2. Click your shutter frame together and screw holes
A. Using the Hoffmann keys in your customized kit, click each segment of your shutter frame together. You can even utilize your body weight if you’d like.
Parts of your shutter frame have the keys fastened to them. It’s okay if they’ve fallen out; simply slide them back in.
It’s generally because the Hoffmann keys have come out on one side that you’re having trouble.
B. If you have T posts, use the long black screws in your custom kit and your cordless drill to secure them to your shutter frame. Your shutter frame has pre-drilled holes that indicate where the T posts should be attached. Your T post will have the letters t at the top and b at the bottom.
C. Lay your shutter frame back down after flipping it over. Drill holes through the back of the shutter frame, aligning each hinge with the 3 mm drill bit on your cordless drill. Additionally, drill four uniformly spaced holes in the top and bottom of the shutter frame’s back. The shutter frame’s rear will fasten to your wall.
3. Mount your shutter frame
A. Place your frame on the wall by lifting it into position. In order to avoid bumping the edges of your shutter frame, it can be beneficial to have two individuals for larger frames.
Using the screws in your custom kit and your cordless drill fitted with a Phillips head drill bit, drill each screw halfway into the top of the shutter frame. Keep in mind that mounting your shutters to wall studs is the best option.
B. To make the frame appear level across the top, adjust it. While doing this, you can place a spirit level on top of the frame.
Tighten the screws on top.
C. Next, drill your side screws in, followed by your bottom screws. Using a spirit level, you can make sure the top of your shutter frame is level.
4. Attach your shutter panels and check your shutter frame
A. Before you begin, take off any black bands from your hinge pins. Grab your left panel and hold it in place. The brackets on the left side of your panel and shutter frame should line up. From the top, insert a hinge pin through the bracket. For every panel, repeat.
B. Verify that your panels are easy to open and close. It’s common to need to lift the panel’s edge and prod it on because they can be heavy.
C. Make sure there is a small, uniform space between the shutter panels and the shutter frame on both sides.
5. Get Insta ready
Take the stickers from your personalized kit and adhere them to every screw that is visible.
Recess fit
1. Get organised
A. After unpacking your kit, carefully spread everything out on a spotless, sturdy surface or the cardboard container it arrived in. When shifting the parts, take care not to scratch them.
B. To make it easier for you to match up the correct panels and hinges later, we label parts of your frame and panels. The shutter panels should be arranged from left to right and correctly up.
2. Click your shutter frame together and screw holes
A. Using the Hoffmann keys in your customized kit, click each segment of your shutter frame together. You can even utilize your body weight if you’d like. Parts of your shutter frame have the keys fastened to them. It’s okay if they’ve fallen out; simply slide them back in.
It’s generally because the Hoffmann keys have come out on one side that you’re having trouble.
C. Using your cordless drill’s 3 mm drill bit, align each hinge with the holes you drill into the interior of the shutter frame. Furthermore, drill two holes with equal spacing in the interior of the shutter frame, near the top and bottom corners.
3. Mount your shutter frame
A. Place your frame into the window frame or recess by lifting it into position. In order to avoid bumping the edges of your shutter frame, it can be beneficial to have two individuals for larger frames. For a truly seamless fit, the shutter frame’s front should be flush with your wall. Additionally, ensure that the space between the shutter frame and the window frame or recess is equal on all four sides.
Using the Phillips head drill bit and the screws included in your kit, drill the screws halfway into the upper corners of the shutter frame.
B. Tighten the top screws after adjusting the frame until it seems level across the top. To make sure the frame is level, use a spirit level on the underside of the top.
C. Next, drill your side screws in, followed by your bottom screws. Any screws in the center of your frame can be backed in and out for convenience. Overtightening them may cause the frame to bend.
Using a spirit level on the bottom of the shutter frame at the top, you can make sure the frame is still level.
D. Grab brackets for your T post are necessary if your frame is three-sided and has a T post or posts. Fasten the brackets to your T post’s bottom. Drill the brackets into your recess using your drill and the included screws. It is best to fasten brackets to each T post’s left, right, and rear sides for stability.
4. Attach your shutter panels and check your shutter frame
A. Before you begin, take off any black bands from your hinge pins. Grab your left panel and hold it in place. The brackets on the left side of your panel and shutter frame should line up. From the top, insert a hinge pin through the bracket. For every panel, repeat.
B. Verify that your panels are easy to open and close. It’s common to need to lift the panel’s edge and prod it on because they can be heavy.
C. Make sure there is a small, uniform space between the shutter panels and the shutter frame on both sides. To straighten the shutter frame, you can slightly back out the screws in the center of the frame.
5. Get Insta ready
A. For three-sided frames, position your light block behind the shutter panels, inside the bottom recess. To fit either side of a window winder, you might need to use a hand saw to cut the bottom light block in half. Make sure the light blocks are in position and that you can simply open and close your shutter panels.
Using your cordless drill, Phillips head drill bit, and two or three screws from your customized kit, screw the light block into your recess.
B. Screw the magnet catchers onto the front of your light block, using your cordless drill with the Phillips head drill bit and the small screws with the white heads in your custom kit. The magnet catchers on your light block, line up with the magnets on the back of your shutter panels.
C. To prevent light leakage, caulk the sides of the shutter frame. After grabbing the gap seal tube from your personalized kit and inserting it into your gap seal applicator pistol, proceed as directed on the tube. Slowly and at a 45-degree angle, move your gap seal applicator pistol along each side. Use your finger or a moist cloth to remove any excess.
If there is a large gap around the sides, let it dry and try again. To see any spots you’ve missed, it’s better to do it in direct sunshine.
Direct mount
1. Get organised
A. After unpacking your kit, carefully spread everything out on a spotless, sturdy surface or the cardboard container it arrived in. When shifting the parts, take care not to scratch them.
B. Your shutter panels are labeled by us. Arrange them from left to right, correctly facing up.
C. If you have T posts, measure and mark up where your T posts will go. You can check back to your panel measurements.
Pre-drill holes for the T post brackets into your window frame or recess using your cordless drill and the 3mm drill bit.
D. Attaching brackets to the top and bottom of each T post’s left, right, and back sides is the greatest option for stability. Ensure that the distance between your posts and the recess at the top and bottom is equal.
2. Mount your shutter panels
A. Using the bracket on the inside border of your window frame or recess, raise each panel into place. For a truly seamless fit, the shutter panels’ fronts should be flush with your wall. Additionally, ensure that the space between your panel and the top and bottom of your window frame or recess is equal.
B. Using your cordless drill, Phillips head drill bit, and the screws from your custom kit, drill one screw into the top bracket and one into the bottom bracket. The oval opening’s center is where the screws are inserted.
To drill your panel brackets into your T posts, use the same procedures if you have T posts.
Screwing into tile, brick, stone, or concrete? See our instructions on how to connect to various surfaces.
C. Verify the smooth operation of your shutter panel. If the panel isn’t level, elevate or lower it a little by loosening the screws. Remove the screws and slide the panel if you need to move it more than they will permit.
After your panel is perfectly level, drill all of the bracket screws.
3. Screw in your light blocks and magnet catchers
A. Place the light block pieces behind each shutter panel on the inside of the window frame or recess. The light blocks fit into the recess or window frame on all four sides. To fit either side of a window winder, you might need to use a handsaw to cut the bottom light block in half.
Make sure the light blocks are in position and that you can simply open and close your shutter panels.
B. Using the Phillips head drill bit and two or three screws from your custom kit, screw each light block into the window frame or recess.
C. Using the little white-headed screws from your custom kit and your cordless drill with the Phillips head drill bit, attach the magnet catchers to the front of your light blocks. The magnets on the rear of your shutter panels align with the magnet catchers on your light block.
4. Get Insta ready
Take the stickers from your personalized kit and adhere them to every screw that is visible.
- Outside the window frame
-
Face fit
1. Get organised
A. After unpacking your kit, carefully spread everything out on a spotless, sturdy surface or the cardboard container it arrived in. When shifting the parts, take care not to scratch them.
B. To make it easier for you to match up the correct panels and hinges later, we label parts of your frame and panels. The shutter panels should be arranged from left to right and correctly up.
2. Click your shutter frame together and screw holes
A. Using the Hoffmann keys in your customized kit, click each segment of your shutter frame together. You can even utilize your body weight if you’d like.
Parts of your shutter frame have the keys fastened to them. It’s okay if they’ve fallen out; simply slide them back in.
It’s generally because the Hoffmann keys have come out on one side that you’re having trouble.
B. If you have T posts, use the long black screws in your custom kit and your cordless drill to secure them to your shutter frame. Your shutter frame has pre-drilled holes that indicate where the T posts should be attached. Your T post will have the letters t at the top and b at the bottom.
C. Lay your shutter frame back down after flipping it over. Drill holes through the back of the shutter frame, aligning each hinge with the 3 mm drill bit on your cordless drill. Additionally, drill four uniformly spaced holes in the top and bottom of the shutter frame’s back. The shutter frame’s rear will fasten to the frame of your window.
3. Mount your shutter frame
A. Lift your frame into place, on the outside of your window frame. It can help to have two people for larger frames, so you don’t bump the corners of your shutter frame.
Drill each screw at the top of your shutter frame part way in, using your cordless drill with the Phillips head drill bit and the screws in your custom kit.
B. Wiggle the frame until you get it looking level across the top. You can rest a spirit level on top of the frame while you do this.
Tighten the top screws.
C. Drill in your side screws next, and then your bottom screws. You can check your shutter frame is even across the top by using a spirit level.
4. Attach your shutter panels and check your shutter frame
A. Before you begin, take off any black bands from your hinge pins. Grab your left panel and hold it in place. The brackets on the left side of your panel and shutter frame should line up. From the top, insert a hinge pin through the bracket. For every panel, repeat.
Does the hinge pin not slide in? Verify whether your frame is fastened upside down or if your panels are inverted.
B. Verify that your panels are easy to open and close. It’s common to need to lift the panel’s edge and prod it on because they can be heavy.
C. Make sure there is a small, uniform space between the shutter panels and the shutter frame on both sides.
5. Get Insta ready
Take the stickers from your personalized kit and adhere them to every screw that is visible.
- Outside a frameless window
-
Face fit frameless window
1. Get organised
A. After unpacking your kit, carefully spread everything out on a spotless, sturdy surface or the cardboard container it arrived in. When shifting the parts, take care not to scratch them.
B. To make it easier for you to match up the correct panels and hinges later, we label parts of your frame and panels. The shutter panels should be arranged from left to right and correctly up.
2. Click your shutter frame together and screw holes
A. Using the Hoffmann keys in your customized kit, click each segment of your shutter frame together. You can even utilize your body weight if you’d like.
Parts of your shutter frame have the keys fastened to them. It’s okay if they’ve fallen out; simply slide them back in.
It’s generally because the Hoffmann keys have come out on one side that you’re having trouble.
B. If you have T posts, use the long black screws in your custom kit and your cordless drill to secure them to your shutter frame. Your shutter frame has pre-drilled holes that indicate where the T posts should be attached. Your T post will have the letters t at the top and b at the bottom.
C. Lay your shutter frame back down after flipping it over. Drill holes through the back of the shutter frame, aligning each hinge with the 3 mm drill bit on your cordless drill. Additionally, drill four uniformly spaced holes in the top and bottom of the shutter frame’s back. The shutter frame’s rear will fasten to your wall.
3. Mount your shutter frame
A. Place your frame on the wall by lifting it into position. In order to avoid bumping the edges of your shutter frame, it can be beneficial to have two individuals for larger frames.
Using the screws in your custom kit and your cordless drill fitted with a Phillips head drill bit, drill each screw halfway into the top of the shutter frame. Keep in mind that mounting your shutters to wall studs is the best option.
B. To make the frame appear level across the top, adjust it. While doing this, you can place a spirit level on top of the frame.
Tighten the screws on top.
C. Next, drill your side screws in, followed by your bottom screws. Using a spirit level, you can make sure the top of your shutter frame is level.
4. Attach your shutter panels and check your shutter frame
A. Before you begin, take off any black bands from your hinge pins. Grab your left panel and hold it in place. The brackets on the left side of your panel and shutter frame should line up. From the top, insert a hinge pin through the bracket. For every panel, repeat.
B. Verify that your panels are easy to open and close. It’s common to need to lift the panel’s edge and prod it on because they can be heavy.
C. Make sure there is a small, uniform space between the shutter panels and the shutter frame on both sides.
5. Get Insta ready
Take the stickers from your personalized kit and adhere them to every screw that is visible.
- Inside the window frame
-
Recess fit
1. Get organised
A. After unpacking your kit, carefully spread everything out on a spotless, sturdy surface or the cardboard container it arrived in. When shifting the parts, take care not to scratch them.
B. To make it easier for you to match up the correct panels and hinges later, we label parts of your frame and panels. The shutter panels should be arranged from left to right and correctly up.
2. Click your shutter frame together and screw holes
A. Using the Hoffmann keys in your customized kit, click each segment of your shutter frame together. You can even utilize your body weight if you’d like. Parts of your shutter frame have the keys fastened to them. It’s okay if they’ve fallen out; simply slide them back in.
It’s generally because the Hoffmann keys have come out on one side that you’re having trouble.
C. Using your cordless drill’s 3 mm drill bit, align each hinge with the holes you drill into the interior of the shutter frame. Furthermore, drill two holes with equal spacing in the interior of the shutter frame, near the top and bottom corners.
3. Mount your shutter frame
A. Place your frame into the window frame or recess by lifting it into position. In order to avoid bumping the edges of your shutter frame, it can be beneficial to have two individuals for larger frames. For a truly seamless fit, the shutter frame’s front should be flush with your wall. Additionally, ensure that the space between the shutter frame and the window frame or recess is equal on all four sides.
Using the Phillips head drill bit and the screws included in your kit, drill the screws halfway into the upper corners of the shutter frame.
B. Tighten the top screws after adjusting the frame until it seems level across the top. To make sure the frame is level, use a spirit level on the underside of the top.
C. Next, drill your side screws in, followed by your bottom screws. Any screws in the center of your frame can be backed in and out for convenience. Overtightening them may cause the frame to bend.
Using a spirit level on the bottom of the shutter frame at the top, you can make sure the frame is still level.
D. Grab brackets for your T post are necessary if your frame is three-sided and has a T post or posts. Fasten the brackets to your T post’s bottom. Drill the brackets into your recess using your drill and the included screws. It is best to fasten brackets to each T post’s left, right, and rear sides for stability.
4. Attach your shutter panels and check your shutter frame
A. Before you begin, take off any black bands from your hinge pins. Grab your left panel and hold it in place. The brackets on the left side of your panel and shutter frame should line up. From the top, insert a hinge pin through the bracket. For every panel, repeat.
B. Verify that your panels are easy to open and close. It’s common to need to lift the panel’s edge and prod it on because they can be heavy.
C. Make sure there is a small, uniform space between the shutter panels and the shutter frame on both sides. To straighten the shutter frame, you can slightly back out the screws in the center of the frame.
5. Get Insta ready
A. For three-sided frames, position your light block behind the shutter panels, inside the bottom recess. To fit either side of a window winder, you might need to use a hand saw to cut the bottom light block in half. Make sure the light blocks are in position and that you can simply open and close your shutter panels.
Using your cordless drill, Phillips head drill bit, and two or three screws from your customized kit, screw the light block into your recess.
B. Screw the magnet catchers onto the front of your light block, using your cordless drill with the Phillips head drill bit and the small screws with the white heads in your custom kit. The magnet catchers on your light block, line up with the magnets on the back of your shutter panels.
C. To prevent light leakage, caulk the sides of the shutter frame. After grabbing the gap seal tube from your personalized kit and inserting it into your gap seal applicator pistol, proceed as directed on the tube. Slowly and at a 45-degree angle, move your gap seal applicator pistol along each side. Use your finger or a moist cloth to remove any excess.
If there is a large gap around the sides, let it dry and try again. To see any spots you’ve missed, it’s better to do it in direct sunshine.
- Inside the window frame
-
Direct mount
1. Get organised
A. After unpacking your kit, carefully spread everything out on a spotless, sturdy surface or the cardboard container it arrived in. When shifting the parts, take care not to scratch them.
B. Your shutter panels are labeled by us. Arrange them from left to right, correctly facing up.
C. If you have T posts, measure and mark up where your T posts will go. You can check back to your panel measurements.
Pre-drill holes for the T post brackets into your window frame or recess using your cordless drill and the 3mm drill bit.
D. Attaching brackets to the top and bottom of each T post’s left, right, and back sides is the greatest option for stability. Ensure that the distance between your posts and the recess at the top and bottom is equal.
2. Mount your shutter panels
A. Using the bracket on the inside border of your window frame or recess, raise each panel into place. For a truly seamless fit, the shutter panels’ fronts should be flush with your wall. Additionally, ensure that the space between your panel and the top and bottom of your window frame or recess is equal.
B. Using your cordless drill, Phillips head drill bit, and the screws from your custom kit, drill one screw into the top bracket and one into the bottom bracket. The oval opening’s center is where the screws are inserted.
To drill your panel brackets into your T posts, use the same procedures if you have T posts.
Screwing into tile, brick, stone, or concrete? See our instructions on how to connect to various surfaces.
C. Verify the smooth operation of your shutter panel. If the panel isn’t level, elevate or lower it a little by loosening the screws. Remove the screws and slide the panel if you need to move it more than they will permit.
After your panel is perfectly level, drill all of the bracket screws.
3. Screw in your light blocks and magnet catchers
A. Place the light block pieces behind each shutter panel on the inside of the window frame or recess. The light blocks fit into the recess or window frame on all four sides. To fit either side of a window winder, you might need to use a handsaw to cut the bottom light block in half.
Make sure the light blocks are in position and that you can simply open and close your shutter panels.
B. Using the Phillips head drill bit and two or three screws from your custom kit, screw each light block into the window frame or recess.
C. Using the little white-headed screws from your custom kit and your cordless drill with the Phillips head drill bit, attach the magnet catchers to the front of your light blocks. The magnets on the rear of your shutter panels align with the magnet catchers on your light block.
4. Get Insta ready
Take the stickers from your personalized kit and adhere them to every screw that is visible.
Have Questions? Reach Out and Inquiry Now
If you have any questions or need assistance, don’t hesitate to reach out! We're here to help and provide the information you need. Whether it's a quick inquiry or a detailed discussion, just let us know how we can assist you today.