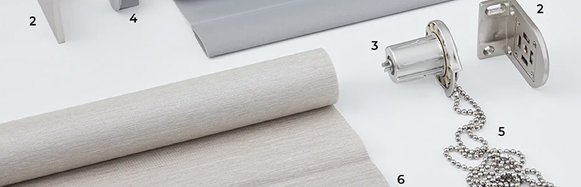
Your custom kit:

OK it’s time to start installing,
let’s take it step by step
Face fit with architrave
1. Get organised
A. Lay out your roller blind under your window on a spotless surface after unpacking your personalized kit.
B. Before you begin, the motor must be completely charged.
Before beginning the installation, charge the motor using the USB-C cable.
Avoid holding the roller blind with the motor at the bottom as this could cause it to slide out.
2. Mark up
A. Grab both brackets and your pencil. Mark two level dots where the brackets will be fastened to the frame using screws after lifting each bracket into place.
B. This will be located in your frame’s upper corners.
3. Attach your brackets
A. Pre-drill two holes where you marked the two pencil dots using your cordless drill and the 3 mm drill bit.
B. Place the control drive bracket on the side of the frame that will house your motor after picking it up. The two holes you just drilled should be exactly over the holes in the bracket. Using your cordless drill and the Phillips head drill bit, fasten the bracket using the screws included in your customized package.
For the pin end bracket, repeat the procedure.
4. Click in your blind
A. Make sure the motor and control bracket are on the same side when you pick up your roller blind. Verify that the program button and charging connector are conveniently located.
B. Slide the motor end into the control bracket with care.
C. After that, insert the pin end into the bracket until a click is heard.
Not quite right? Do not be concerned. It should be easy for your blind to click into the brackets. Go to the ‘I need some more help’ section at the bottom if you run into any problems.
D. Put your two bracket covers on the exterior of each bracket to complete the look.
How to pair your remote with linear blinds motorised roller blinds
5. Charge your motor battery
A. Put in the USB-C charging cable that is situated on the linear blinds blind motor’s side. Keep in mind that you must charge your motor batteries before you begin.
6. Wake up your blind motor
A. To activate your roller blind motor, press the program button on the side of the motor for two seconds.
The LED light will flash whenever the blind is jogged up and down once.
7. Select your channel
A. The linear blinds remote features 6 channels.
To select the appropriate channel on the remote, toggle between the CH- and CH+ buttons.
The blue LED light on the top of the remote indicates which channel is selected.
8. Assign your blind to the channel
A. To make your roller blind jog once, hold down the program button on the side of the motor for two seconds.
B. Holding down the P2 button on the rear of your remote control for two seconds will cause the motor to jog twice in ten seconds.
Can’t blinds jog? ‘I need some extra help’ is what you see at the bottom of the page.
9. Check your roll direction
A. Press the up or down button on your remote to ensure that your blinds slide in the correct direction.
The up and down buttons should raise and lower your blinds, respectively. If this is incorrect, proceed to Section B. If it’s correct, proceed to Section 10.
B. If your roll direction is incorrect, hold the square and heart buttons simultaneously for 2 seconds until the motor jogs once.
Check again, and your blind should be rolling in the appropriate way now.
10. Set your blinds upper limit
A. Holding down the up button will cause the blind to continue roll up.
Then, to stop it at the chosen upper limit, press the square/stop button.
B.To lock the top limit, hold down the up and heart buttons at the same time for two seconds, until the blind jogs up and down twice.
11. Set your blinds lower limit
A. Holding down the down button will cause the blind to continuously roll down.
Then, to stop it at the lower limit you’ve chosen, press the square/stop button.
B.To lock the lower limit, hold down and heart buttons at the same time for two seconds until the blind jogs up and down twice.
12. You’re all set to start using your linear blinds remote!
A. To operate your blind, press the up and down buttons. To stop your blind from moving, press the square button.
Face fit frameless window
1. Get organised
A. Lay out your roller blind under your window on a spotless surface after unpacking your personalized kit.
B. Before you begin, the motor must be fully charged.
Before beginning the installation, charge the motor using the USB-C cable.
2. Mark up
Grab both brackets and your pencil. Mark two level dots where the brackets will be fastened to the wall with screws after lifting each bracket into place.
Your left and right brackets’ outside measurements will be the blind width you selected.
3. Attach your brackets
A. Use a cordless drill and a 3 mm drill bit to pre-drill two holes where you marked the two pencil dots if you’re drilling into wood underneath the plaster.
Use anchors or plugs appropriate for the material you’re drilling into if there isn’t any timber
B. Place the control drive bracket on the window’s side where the motor will be located.
Make sure the two holes you just drilled line up with the holes in the bracket. Using your cordless drill and the Phillips head drill bit, fasten the bracket using the screws included in your customized package.
For the pin end bracket, follow these steps again.
4. Click in your blind
A. Make sure your chain and chain bracket are on the same side when you pick up your roller blind. Verify that the ACMEDA logo is at six o’clock and the hood over the chain is at twelve.
B. The chain end should be inserted into the chain drive bracket gently.
C. After that, insert the pin end into the bracket until a click is heard.
Not quite right? Don’t worry. It should be easy for your blind to click into the brackets. Go to ‘I need some extra help’ at the bottom if it doesn’t.
How to pair your remote with linear blinds motorised roller blinds
5. Charge your motor battery
A. Put the USB-C charging wire into the roller blind motor’s side. Keep in mind that you must charge your motor batteries before you begin.
6. Wake up your blind motor
A. To activate your roller blind motor, press the program button on the side of the motor for two seconds.
It should jiggle the blinds up and down once.
7. Wake up your blind motor
A. The linear blinds remote features 6 channels.
To select the appropriate channel on the remote, toggle between the CH- and CH+ buttons.
The blue LED light on the top of the remote indicates which channel is selected.
8. Assign your blind to the channel
A. Hold down the program button on the side of your roller blind motor for 2 seconds, then jog the blind once.
B. Within 10 seconds, hold down the P2 button on the back of your remote for 2 seconds until the motor jogs twice.
Blinds will not jog? See ‘I Need Some Extra Help’ at the bottom of the page.
9. Check your roll direction
A. Make sure your blind rolls in the correct direction by pressing the up or down button on your remote control.
Your blind should roll up when you press the up button and down when you use the down button.
B. Holding both the square and heart buttons simultaneously for two seconds will cause the motor to jog once if your roll direction is incorrect.
Your blind should now roll in the correct direction if you double-check.
10. Set your blinds upper limit
A. Press and hold the up button until the blinds roll up consistently.
Then, hit the square/stop button to bring it to your specified upper limit.
B. Hold holding the up and heart buttons for 2 seconds until the blind jogs up and down twice, locking the upper limit.
11. Set your blinds lower limit
A. Press and hold the down button until the blinds glide down constantly.
Then, using the square/stop button, halt it at the specified lower limit.
B. Hold down and heart buttons together for 2 seconds till the blind jogs up and down twice to lock the lower limit.
12. You’re all set to start using your linear blinds remote!
A. Use the up and down buttons to operate your blind, and the square button to stop it moving.
Recess fit
1. Get organised
A. Unpack your bespoke kit and set up your roller blind on a clean floor under your window.
B. Before you start, make sure the motor is fully charged.
Before proceeding with the installation, charge the motor using the USB-C connector.
2. Mark up
A. Take a pencil and two brackets. Lift each bracket into place and mark two level dots where the screws will join it to the frame.
B. Position these in the upper corners of your frame, leaving enough space between the window glass and any impediments, such as sliding door handles, winders, or mullions.
3. Attach your brackets
A. Pre-drill two holes where you marked the two pencil dots using your cordless drill and a 3 mm drill bit.
B. Place the control drive bracket on the side of the window where the motor will reside.
Ensure that the holes in the bracket match the two holes you just drilled. Secure the bracket with the screws from your custom kit, using your cordless drill and a Phillips head drill bit.
Repeat the operation with the pin end bracket.
4. Click in your blind
A. Pick up your roller blind and position the motor on the same side as the control bracket. Make sure the charging connector and program button are easily accessible.
B. Gently insert the motor end into the control bracket.
C. Then, insert the pin end into the pin end bracket until you hear a click.
Not a perfect fit? Do not worry. Your blind should fit easily into the brackets. If you have any problems, proceed to the ‘I need some extra help’ section at the bottom.
How to pair your remote with linear blinds motorised roller blinds
5.Charge your motor battery
A. Insert the USB-C charging cord found on the side of your roller blind motor. Remember to charge your motor batteries before starting.
6. Wake up your blind motor
A. To activate your roller blind motor, press the program button on the side of the motor for two seconds.
The blind should move up and down once, and the LED light will flash.
7. Select your channel
A. There are six channels on the linear blinds remote control.
Toggle between the CH- and CH+ buttons on the remote to select the appropriate channel.
The blue LED light on the remote’s top indicates the channel.
8. Assign your blind to the channel
A. Hold down the program button on the side of your roller blind motor for 2 seconds, then jog the blind once.
B. Within 10 seconds, hold down the P2 button on the back of your remote for 2 seconds until the motor jogs twice.
Blinds will not jog? See ‘I Need Some Extra Help’ at the bottom of the page.
9. Check your roll direction
A. Make sure your blind rolls in the correct direction by pressing the up or down button on your remote control.
Your blind should roll up when you press the up button and down when you use the down button.
B. Holding both the square and heart buttons simultaneously for two seconds will cause the motor to jog once if your roll direction is incorrect.
Your blind should now roll in the correct direction if you double-check.
10. Set your blinds upper limit
A. Press and hold the up button until the blinds roll up consistently.
Then, hit the square/stop button to bring it to your specified upper limit.
B. Hold holding the up and heart buttons for 2 seconds until the blind jogs up and down twice, locking the upper limit.
11. Set your blinds lower limit
A. Press and hold the down button until the blinds glide down constantly.
Then, using the square/stop button, halt it at the specified lower limit.
B. Hold down and heart buttons together for 2 seconds till the blind jogs up and down twice to lock the lower limit.
12. You’re all set to start using your linear blinds remote!
A. Use the up and down buttons to operate your blind, and the square button to stop it moving.
- Outside the frame
-
Face fit with architrave
1. Get organised
A. Lay out your roller blind under your window on a spotless surface after unpacking your personalized kit.
B. Before you begin, the motor must be completely charged.
Before beginning the installation, charge the motor using the USB-C cable.
Avoid holding the roller blind with the motor at the bottom as this could cause it to slide out.
2. Mark up
A. Grab both brackets and your pencil. Mark two level dots where the brackets will be fastened to the frame using screws after lifting each bracket into place.
B. This will be located in your frame’s upper corners.
3. Attach your brackets
A. Pre-drill two holes where you marked the two pencil dots using your cordless drill and the 3 mm drill bit.
B. Place the control drive bracket on the side of the frame that will house your motor after picking it up. The two holes you just drilled should be exactly over the holes in the bracket. Using your cordless drill and the Phillips head drill bit, fasten the bracket using the screws included in your customized package.
For the pin end bracket, repeat the procedure.
4. Click in your blind
A. Make sure the motor and control bracket are on the same side when you pick up your roller blind. Verify that the program button and charging connector are conveniently located.
B. Slide the motor end into the control bracket with care.
C. After that, insert the pin end into the bracket until a click is heard.
Not quite right? Do not be concerned. It should be easy for your blind to click into the brackets. Go to the ‘I need some more help’ section at the bottom if you run into any problems.
D. Put your two bracket covers on the exterior of each bracket to complete the look.
How to pair your remote with linear blinds motorised roller blinds
5. Charge your motor battery
A. Put in the USB-C charging cable that is situated on the linear blinds blind motor’s side. Keep in mind that you must charge your motor batteries before you begin.
6. Wake up your blind motor
A. To activate your roller blind motor, press the program button on the side of the motor for two seconds.
The LED light will flash whenever the blind is jogged up and down once.
7. Select your channel
A. The linear blinds remote features 6 channels.
To select the appropriate channel on the remote, toggle between the CH- and CH+ buttons.
The blue LED light on the top of the remote indicates which channel is selected.
8. Assign your blind to the channel
A. To make your roller blind jog once, hold down the program button on the side of the motor for two seconds.
B. Holding down the P2 button on the rear of your remote control for two seconds will cause the motor to jog twice in ten seconds.
Can’t blinds jog? ‘I need some extra help’ is what you see at the bottom of the page.
9. Check your roll direction
A. Press the up or down button on your remote to ensure that your blinds slide in the correct direction.
The up and down buttons should raise and lower your blinds, respectively. If this is incorrect, proceed to Section B. If it’s correct, proceed to Section 10.
B. If your roll direction is incorrect, hold the square and heart buttons simultaneously for 2 seconds until the motor jogs once.
Check again, and your blind should be rolling in the appropriate way now.
10. Set your blinds upper limit
A. Holding down the up button will cause the blind to continue roll up.
Then, to stop it at the chosen upper limit, press the square/stop button.B.To lock the top limit, hold down the up and heart buttons at the same time for two seconds, until the blind jogs up and down twice.
11. Set your blinds lower limit
A. Holding down the down button will cause the blind to continuously roll down.
Then, to stop it at the lower limit you’ve chosen, press the square/stop button.B.To lock the lower limit, hold down and heart buttons at the same time for two seconds until the blind jogs up and down twice.
12. You’re all set to start using your linear blinds remote!
A. To operate your blind, press the up and down buttons. To stop your blind from moving, press the square button.
- Outside a frameless window
-
Face fit frameless window
1. Get organised
A. Lay out your roller blind under your window on a spotless surface after unpacking your personalized kit.
B. Before you begin, the motor must be fully charged.
Before beginning the installation, charge the motor using the USB-C cable.
2. Mark up
Grab both brackets and your pencil. Mark two level dots where the brackets will be fastened to the wall with screws after lifting each bracket into place.
Your left and right brackets’ outside measurements will be the blind width you selected.
3. Attach your brackets
A. Use a cordless drill and a 3 mm drill bit to pre-drill two holes where you marked the two pencil dots if you’re drilling into wood underneath the plaster.
Use anchors or plugs appropriate for the material you’re drilling into if there isn’t any timber
B. Place the control drive bracket on the window’s side where the motor will be located.
Make sure the two holes you just drilled line up with the holes in the bracket. Using your cordless drill and the Phillips head drill bit, fasten the bracket using the screws included in your customized package.
For the pin end bracket, follow these steps again.
4. Click in your blind
A. Make sure your chain and chain bracket are on the same side when you pick up your roller blind. Verify that the ACMEDA logo is at six o’clock and the hood over the chain is at twelve.
B. The chain end should be inserted into the chain drive bracket gently.
C. After that, insert the pin end into the bracket until a click is heard.
Not quite right? Don’t worry. It should be easy for your blind to click into the brackets. Go to ‘I need some extra help’ at the bottom if it doesn’t.
How to pair your remote with linear blinds motorised roller blinds
5. Charge your motor battery
A. Put the USB-C charging wire into the roller blind motor’s side. Keep in mind that you must charge your motor batteries before you begin.
6. Wake up your blind motor
A. To activate your roller blind motor, press the program button on the side of the motor for two seconds.
It should jiggle the blinds up and down once.
7. Wake up your blind motor
A. The linear blinds remote features 6 channels.
To select the appropriate channel on the remote, toggle between the CH- and CH+ buttons.
The blue LED light on the top of the remote indicates which channel is selected.
8. Assign your blind to the channel
A. Hold down the program button on the side of your roller blind motor for 2 seconds, then jog the blind once.
B. Within 10 seconds, hold down the P2 button on the back of your remote for 2 seconds until the motor jogs twice.
Blinds will not jog? See ‘I Need Some Extra Help’ at the bottom of the page.
9. Check your roll direction
A. Make sure your blind rolls in the correct direction by pressing the up or down button on your remote control.
Your blind should roll up when you press the up button and down when you use the down button.
B. Holding both the square and heart buttons simultaneously for two seconds will cause the motor to jog once if your roll direction is incorrect.
Your blind should now roll in the correct direction if you double-check.
10. Set your blinds upper limit
A. Press and hold the up button until the blinds roll up consistently.
Then, hit the square/stop button to bring it to your specified upper limit.B. Hold holding the up and heart buttons for 2 seconds until the blind jogs up and down twice, locking the upper limit.
11. Set your blinds lower limit
A. Press and hold the down button until the blinds glide down constantly.
Then, using the square/stop button, halt it at the specified lower limit.B. Hold down and heart buttons together for 2 seconds till the blind jogs up and down twice to lock the lower limit.
12. You’re all set to start using your linear blinds remote!
A. Use the up and down buttons to operate your blind, and the square button to stop it moving.
- Inside the frame
-
Recess fit
1. Get organised
A. Unpack your bespoke kit and set up your roller blind on a clean floor under your window.
B. Before you start, make sure the motor is fully charged.
Before proceeding with the installation, charge the motor using the USB-C connector.2. Mark up
A. Take a pencil and two brackets. Lift each bracket into place and mark two level dots where the screws will join it to the frame.
B. Position these in the upper corners of your frame, leaving enough space between the window glass and any impediments, such as sliding door handles, winders, or mullions.
3. Attach your brackets
A. Pre-drill two holes where you marked the two pencil dots using your cordless drill and a 3 mm drill bit.
B. Place the control drive bracket on the side of the window where the motor will reside.
Ensure that the holes in the bracket match the two holes you just drilled. Secure the bracket with the screws from your custom kit, using your cordless drill and a Phillips head drill bit.
Repeat the operation with the pin end bracket.
4. Click in your blind
A. Pick up your roller blind and position the motor on the same side as the control bracket. Make sure the charging connector and program button are easily accessible.
B. Gently insert the motor end into the control bracket.
C. Then, insert the pin end into the pin end bracket until you hear a click.
Not a perfect fit? Do not worry. Your blind should fit easily into the brackets. If you have any problems, proceed to the ‘I need some extra help’ section at the bottom.
How to pair your remote with linear blinds motorised roller blinds
5.Charge your motor battery
A. Insert the USB-C charging cord found on the side of your roller blind motor. Remember to charge your motor batteries before starting.
6. Wake up your blind motor
A. To activate your roller blind motor, press the program button on the side of the motor for two seconds.
The blind should move up and down once, and the LED light will flash.
7. Select your channel
A. There are six channels on the linear blinds remote control.
Toggle between the CH- and CH+ buttons on the remote to select the appropriate channel.
The blue LED light on the remote’s top indicates the channel.
8. Assign your blind to the channel
A. Hold down the program button on the side of your roller blind motor for 2 seconds, then jog the blind once.
B. Within 10 seconds, hold down the P2 button on the back of your remote for 2 seconds until the motor jogs twice.
Blinds will not jog? See ‘I Need Some Extra Help’ at the bottom of the page.
9. Check your roll direction
A. Make sure your blind rolls in the correct direction by pressing the up or down button on your remote control.
Your blind should roll up when you press the up button and down when you use the down button.
B. Holding both the square and heart buttons simultaneously for two seconds will cause the motor to jog once if your roll direction is incorrect.
Your blind should now roll in the correct direction if you double-check.
10. Set your blinds upper limit
A. Press and hold the up button until the blinds roll up consistently.
Then, hit the square/stop button to bring it to your specified upper limit.B. Hold holding the up and heart buttons for 2 seconds until the blind jogs up and down twice, locking the upper limit.
11. Set your blinds lower limit
A. Press and hold the down button until the blinds glide down constantly.
Then, using the square/stop button, halt it at the specified lower limit.B. Hold down and heart buttons together for 2 seconds till the blind jogs up and down twice to lock the lower limit.
12. You’re all set to start using your linear blinds remote!
A. Use the up and down buttons to operate your blind, and the square button to stop it moving.
Have Questions? Reach Out and Inquiry Now
If you have any questions or need assistance, don’t hesitate to reach out! We're here to help and provide the information you need. Whether it's a quick inquiry or a detailed discussion, just let us know how we can assist you today.